
Are you tired of logging into your Facebook on Saturdays and Sundays to make updates? Do you have trouble keeping track of all your outgoing social media posts? If so, a social media scheduling platform, like HootSuite, may be right for you.
What is HootSuite
HootSuite is a social media marketing and management dashboard. Within HootSuite, you can manage multiple social media networks and profiles, work with large social media teams, and schedule future posts. In addition, HootSuite offers robust reporting capabilities. At this time, you can manage your Facebook, Twitter, LinkedIn, Instagram, YouTube, and Google+ accounts through Hootsuite.
Why You Should Schedule Posts
There are several reasons why you may want to schedule social media posts in advance, including:
- Weekends or Time Off
Nobody likes to work after hours. Instead of trying to remember to log in and post outside of office hours, schedule ahead for the exact day and time you prefer. - Multiple Clients or Channels
If you are an agency with multiple clients or you just manage several different channels for your company, you can save time by scheduling posts at the beginning of the day or week. - Organization
If you like to be organized, scheduling posts allow you to see all of your outgoing posts across all platforms on one user-friendly dashboard. It also makes it easy for you to double check your work and make changes to scheduled posts.
How to Schedule Posts on HootSuite
Once you have your HootSuite account set up and you have added all of your social media channels, scheduling your posts is pretty simple. Just follow these steps:
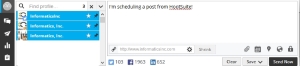
- If you have an image or video to add, select the paperclip icon off to the right of the link box and upload it from your computer.
- Now that you have the basics of your post, you are ready to schedule. Select the calendar icon to the right of the paperclip icon.
- Here you can enter a specific date and time. You can even check the box to receive an email when your post has been delivered.
- Once you have selected your date and time, hit the “Schedule” button. Your post should now appear on the Publisher page. Anytime you want to see your pending posts, just navigate back to this Publisher page. And if you have any edits to make, you can easily do so here.
If you need assistance with managing your social media marketing strategy or utilizing HootSuite, contact Informatics Inc. today.